SEPTA Subway-Surface Streetcar Lines
Overview
Philadelphia, like Boston and San Francisco, has reduced streetcar operations to a tunnel-and-spoke system, where a tunnel service the downtown central business district and some number of branch lines feed into it at a location outside of the CBD. Philadelphia's formerly large streetcar system has been reduced to the five services feeding into its streetcar tunnel. The five routes, the #10, #11, #13, #34, and #36, primarily serve Philadelphia's southwestern side.
(Note: Philadelphia's route #15 Girard Avenue, was changed from bus back to streetcars in September 2005. This route does not use the downtown tunnel, but is connected to the tunnel route trackage. Without this connection to existing depots, the restoration of streetcar service on route #15 may not have been practical.)
Station By Station
Subway-Surface Tunnel
The subway-surface tunnel in Philadelphia begins at 13th - Juniper Street (City Hall), where the loop connection between inbound and outbound exists. Board a car here for a trip through the tunnel, then return via an inbound car to complete your journey. All stations except 13th-Juniper and 15th have maroon tile floors. 13th-Juniper has grey and green tiles and 15th has concrete floors. All station platforms (except 13th, 15th, 19th inbound, and 30th) have yellow-red-red-yellow tile edges. 13th, 19th inbound, and 30th have tactile warning strips and 15th has old painted yellow edges.
There are two "berths" at 13th-Juniper where different lines are to board, with one berth directly behind the other on single track. Routes 11 and 13 board at berth 1 and routes 10, 34, and 36 board at berth 2. This station is currently being renovated and includes green and grey floor tile, along with yellow tactile edging and fluorescent lighting. There is also a free interchange with the Market-Frankford line. This station will be wheelchair accessible when renovations are finished. Both doors can be used to board, since you have already paid your fare.
Your car proceeds out of the station, past a dead end "siding" where bad-order cars could be stored, around the squeaky loop which curves severely to the left, until 15th Street station is reached. This is not the original westbound 15th Street location, as it was moved in the 1970's to its new location for better connections with the Broad Street subway. Two berths are also located here. Once again, both doors are open as your fare is already paid. There is some level of daylight allowed into the station through a planter which extends up through Dilworth Plaza above. Free transfers to the Broad Street subway, as well as the Market-Frankford el, can be had here, the latter through a very indirect passage through the City Hall station of the Broad St subway.
Cars leave 15th and curve slightly to the right, passing the former 15th Street stop as well as the el's 15th Street station, then the tracks parallel the el tracks for a distance.
19th Street is next, marking the start of stations at which fares must be paid on the car (30th Street will be the only exception beyond this point). The old style architecture of the original 1907 subway is evident at 19th.
22nd Street is next, and it reflects the 50's era of construction. The westbound station at 22nd is close to the former subway portal when the subway ended here before 1955.
Your car dives into the Schuylkill River tunnel with timed signals controlling the downslope speed, quickly climbing back out and reaching 30th Street. Both doors are once again opened for business, as fares are paid to the cashier on the mezzanine, and free transfers are available to the Market-Frankford el. This is your last chance to switch to an inbound car for free. 30th Street has recently been renovated and includes full wheelchair accessibility by elevator, tactile edging, improved signage, electronic displays, and a a brand new entrance kiosk with an elevator, benches, stairs, skylights, and a huge number 30. This stop also connects to the main 30th Street Station, which serves all Amtrak NE Corridor trains, as well as all SEPTA Regional Rail lines.
Leaving 30th, your car climbs above the el tracks, past the site of a March 1990 derailment, to a separate subway alignment. You curve left and immediately enter 33rd St - Drexel University station. This station resembles 22nd street, however the street entrance has been rehabbed. The entrances are now sort of kiosks, and the sides have blue and green tile.
Departing 33rd, your trolley car then curves right again. Shortly, your car slows for the junction with the 36th Street portal. If you boarded a Route 10 car, you will climb the incline and leave the subway to arrive at the 36th & Ludlow Street Portal stop. Otherwise, you drift slowly around the incline, make a sharp left, and continue on to 36th Street - Sansom station. This station has a mezzanine (without fare control as you pay onboard here) which has a crossover to the other direction, as well as exits to either side of 36th street.
Past Sansom, your car continues straight, then right, beneath the University of Pennsylvania campus (and the former Woodland Avenue), to 37th Street - University of Pennsylvania station. The two platforms at this location are offset, thus you will pass the inbound before coming to the outbound. Although all the stations are very long, generally for safety reasons, except at Juniper, 15th and 30th, only one car will enter the station at a time. The block signals just outside the stations have a red over yellow indication which will come on once a leading car has stopped at a station, and this theoretically allows a following car to enter the station proceeding with caution. Due to several accidents, this practice has stopped.
Out of 37th, your car speeds through the tunnel until daylight can be seen ahead, at the 40th Street Portal. Once the portal is reached, Routes 11, 13 and 36 cars take the switch to the left, with Route 34 turning to the right. Before the portal area trackage was realigned in 1983 (to allow direct turnarounds in each direction, as well as sidings for storage), tracks came to a "T" configuration, then split, which limited turnbacks in both directions. Before the late 70's, 40th Street also crossed the tracks just outside the portal, which led to some traffic difficulties. There are three separate low platforms here, one each for Route 34 Outbound, Routes 11, 13, and 36 Outbound, and all lines inbound to City Hall.
Reboarding an inbound car, the trip is similar. The main differences are 19th Street, where the inbound platform is about half the normal length and has tactile edging, the area east of 19th Street, where signals end (until east of 15th Street), the modernized 15th Street station, and the "squealy" loop around City Hall, once used by the Market-Frankford trains as well as the surface cars. The trip ends where you started, at Juniper Street, where you can connect to the Market-Frankford el or visit SEPTA's museum.
| Five Random Images | ||||
 Image 52604 (115k, 820x555) Photo by: Access Systems Location: 30th Street | 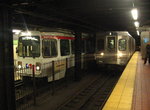 Image 99560 (234k, 1024x768) Photo by: Andre Samuel Location: 30th Street |  Image 106699 (242k, 1044x788) Photo by: S.J. Dibai Location: 33rd Street/Drexel University | 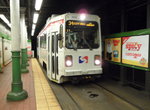 Image 114064 (198k, 1044x788) Photo by: Bob Wright Location: 19th Street |  Image 139329 (251k, 1044x703) Photo by: David Pirmann Location: City Hall (13th/Juniper) |
Subway-Surface Diversion
The "Subway-Surface Diversion" is trackage between 49th & Woodland and 40th & Girard that is used to connect the various lines that use the Subway-Surface tunnel, in case the tunnel is closed for maintenance or otherwise inaccessible. The diversion route crosses Market Street and allows a transfer to the SEPTA Market-Frankford Elevated for passengers to continue their trips downtown.
| Five Random Images | ||||
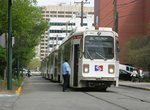 Image 61300 (166k, 820x620) Photo by: Dante D. Angerville Location: Filbert/39th |  Image 61329 (147k, 820x620) Photo by: Dante D. Angerville Location: Island/Glenmore |  Image 103091 (236k, 1044x701) Photo by: Richard Panse Location: Filbert/39th |  Image 119139 (209k, 1024x702) Collection of: George Conrad Collection Location: Ogden/Preston |  Image 147768 (398k, 1044x788) Photo by: Bob Wright Location: 41st/Spruce |
Rt. 10-Overbrook
| Five Random Images | ||||
 Image 45525 (210k, 1044x701) Photo by: David Pirmann Location: Lansdowne/54th Loop |  Image 45535 (175k, 1044x731) Photo by: David Pirmann Location: Lansdowne/54th Loop | 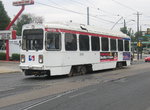 Image 98862 (236k, 1024x768) Photo by: Andre Samuel Location: Lancaster/Girard |  Image 118755 (134k, 1024x625) Collection of: George Conrad Collection Location: Lansdowne/56th |  Image 150973 (723k, 1600x1067) Collection of: David Pirmann Location: Lansdowne/52nd |
Rt. 11-Darby
| Five Random Images | ||||
 Image 16972 (215k, 1044x788) Photo by: David Pirmann Location: Darby Loop |  Image 74184 (252k, 1024x686) Collection of: Joe Testagrose Location: Woodland/55th |  Image 151042 (782k, 1600x1067) Collection of: David Pirmann Location: Woodland/40th (40th St Portal) |  Image 151045 (791k, 1600x1600) Collection of: David Pirmann Location: Woodland/40th (40th St Portal) |  Image 151047 (1057k, 1600x1600) Collection of: David Pirmann Location: Woodland/Island/Cobbs Creek Pky. |
Rt. 13-Yeadon
| Five Random Images | ||||
 Image 45060 (221k, 720x479) Photo by: Peter Ehrlich Location: Chester/65th |  Image 68041 (36k, 669x561) Photo by: Bob Wright Location: Darby Loop |  Image 88769 (236k, 1044x788) Photo by: Jeff Didlake Location: Yeadon Loop |  Image 118463 (179k, 1024x794) Collection of: George Conrad Collection Location: Kingsessing/Cemetery (Mt. Moriah Loop) |  Image 137591 (324k, 1044x788) Photo by: Bob Wright Location: Woodland/40th (40th St Portal) |
Rt. 34-Angora
| Five Random Images | ||||
 Image 61331 (144k, 820x620) Photo by: Dante D. Angerville Location: Woodland/40th (40th St Portal) |  Image 68008 (81k, 983x705) Photo by: Bob Wright Location: Baltimore/61st |  Image 68538 (272k, 1044x788) Photo by: Bob Wright Location: Woodland/40th (40th St Portal) |  Image 137589 (405k, 1044x788) Photo by: Bob Wright Location: Woodland/40th (40th St Portal) |  Image 151017 (636k, 1600x1067) Collection of: David Pirmann Location: Woodland/40th (40th St Portal) |
Rt. 36-Eastwick
| Five Random Images | ||||
 Image 16982 (280k, 1044x788) Photo by: David Pirmann Location: Woodland/Woodland Terr. |  Image 37444 (149k, 720x478) Photo by: Peter Ehrlich Location: Eastwick Loop (Island/80th) |  Image 43663 (190k, 1024x671) Collection of: Joe Testagrose Location: Island Ave |  Image 137592 (457k, 1044x788) Photo by: Bob Wright Location: Woodland/40th (40th St Portal) |  Image 151370 (792k, 1600x1067) Collection of: David Pirmann Location: Elmwood/63rd |
Roster
Service is operated by 112 single-ended Kawasaki LRV cars built in 1982. They are numbered 9000-9111. They are very similar to the PCC cars they replaced.
Photos
Photo Search
Photo Gallery
| Five Random Images | ||||
 Image 16945 (104k, 820x620) Photo by: David Pirmann Location: 40th Street Portal |  Image 45068 (165k, 720x465) Photo by: Peter Ehrlich Location: Woodland/40th (40th St Portal) |  Image 47092 (289k, 1024x805) Photo by: Chris Leverett Location: Elmwood Depot |  Image 69059 (45k, 750x590) Photo by: Bob Wright Location: 40th Street Portal |  Image 151819 (353k, 1200x800) Collection of: David Pirmann Location: Lancaster/Girard |
Page Credits
By Bob Wright and Gregory Jordan-Detamore.
| ||||||||||||||